|
SAVE YOUR BACK WITH A CUSTOM-FITTED, SPLINTED WEIGHT BELT
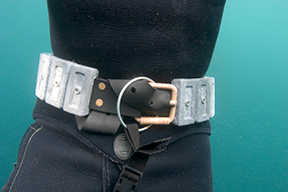
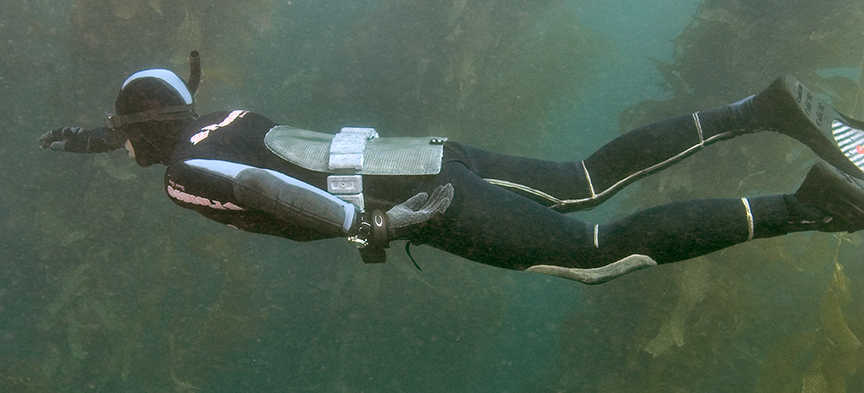
Many freedivers have lower back problems and pain. Back pain is aggravated by traditional weight belts, which place all the weight over the vulnerable lumbar-sacral region of the back, just above your buttocks. Compounding the problem is that the relaxation so essential for successful freediving allows the back to arch even more than usual, which aggravates most back pain. Enterprising and handy divers have made many clever solutions. Some move weight off the lower back to the upper back over the chest and/or to the ankles. Both of these solutions sink the affected body part making diving more difficult and each is more difficult to ditch in an emergency. Because the traditional weight belt site is the best location to balance the body, many have developed wide belts made from un-yielding industrial conveyer belt material while others have use all sorts of plastic discs to distribute the weight off the small of the back. I have developed a solution by fabricating a custom-fitted rigid splint. You can now swim comfortably with this centrally positioned weight belt/splint combination. While the sleek splint comfortably distributes weight equally to the upper back and pelvis, the stretchable rubber belt still allows you to fully expand your diaphragm on the surface and keeps the belt in place at depth. The custom fit and the crotch strap hold the belt/splint firmly in place while the large ring on the crotch strap allows for the easy quick release and rapid shedding of the assembly. I have found the belt/splint to be very comfortable. When you jackknife your body during the surface dive, the splint will separate slightly from your back otherwise it stays conformed to your back and poses no problems and causes no extra drag. If you have a sore back after diving, are handy with tools, have a spare $200 and half of a day, you can make your own custom-fitted belt/splint. World-record holder for yellowtail Joe Tobin built a splint according the guidelines found in this article. Here is what he says, “After 23 years of Fire/EMS, my back is fragile and the back pain after diving had become worrisome. Moving the belt lower to my hips (via crotch strap) has helped some, however, I would still take time to recover from the pain after diving. I even started to worry that I may have to make some choices about diving… Now that I have used my own splint—NO PAIN! What a difference. The splint is relatively easy to make, very comfortable to wear and does not interfere with my diving. I did notice it catch a little water if I made a quick duck-dive after game fish but the usual dive from the surface presented no problem.” Here is a summary of the project: Make a plaster impression of your back then make a model of your back using the same materials. Cover the model with a wetsuit and lay up a fiberglass cloth/epoxy brace. Finish the brace and add the hardware for the rubber belt. BILL OF MATERIALS
TOOLS
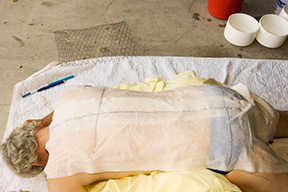
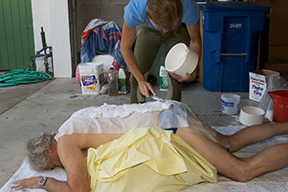
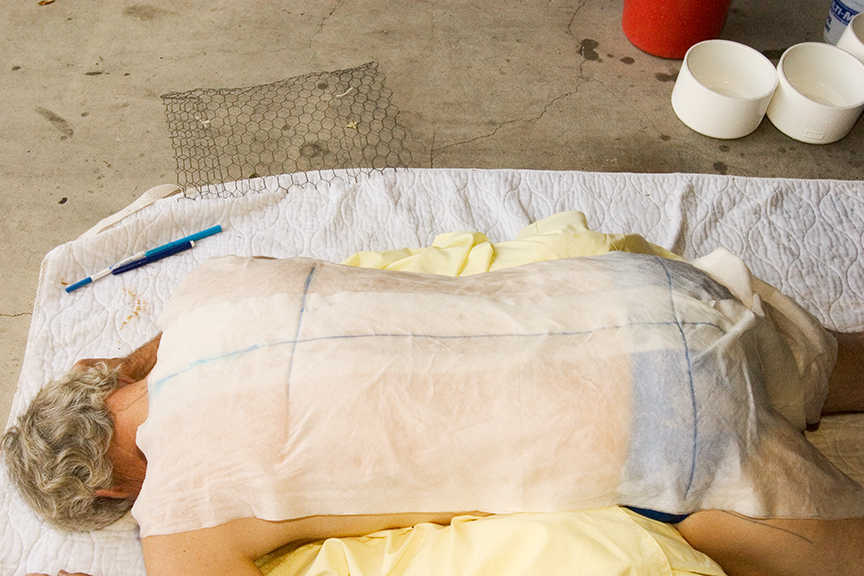
AND ONE LOYAL FRIEND Lay face down in a position comfortable for your back with several pillows supporting your pelvis. Have your assistant place 4 layers of wet paper towel on your back—smooth to conform to the back’s contours. Using the felt pen, mark the upper extent of the splint on the paper towels with a horizontal line just under the shoulder blades. Draw a vertical line down the center of your back. Draw another horizontal line where your butt cheeks start. The marks should transfer to the surface of the impression. Make a chicken wire support by cutting and bending the wire to conform as close as possible to the back’s contour. Mark the top of the wire for orientation. Mix plaster in two containers—2 pounds each in two sets of two. (It is a good idea to test a small batch of plaster to see how long you can work with it until it sets up). If the plaster takes over 10 minutes to set, add accelerator water and normal water mixing into a heavy paste the consistency of thick cake frosting. Note that if the mix is too thick, it might set up before you can apply it and if it is too thin, it will slow the set and run off your back. Apply the first two containers. Smooth the first two mixes on the towels about 2-inches thick over the back taking care not to create too many voids. Mix the last two containers and apply to the back. Imbed the chicken wire into the wet plaster and cover the wire with the last two plaster mixes.
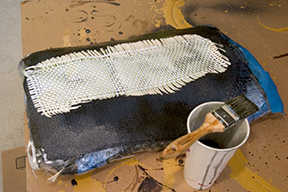
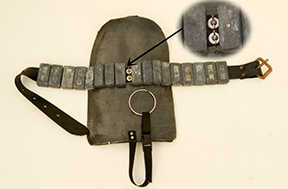
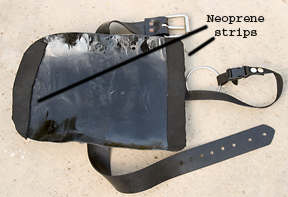
When the plaster mold is set hard, turn it over and remove any imbedded towels. Use the mixing blade to smooth out wrinkles in the plaster made from the towels and use a small mix of plaster to fill voids. The mold should now be fairly smooth. Cover the entire surface with petroleum jelly and then cover the jelly with clear plastic wrap—this is your mold release mechanism. Using the felt marker, re-mark the inside of the impression indicating the center of the back and the top and bottom of the splint. The marks will come off in the mold helping you to keep the back’s orientation. Fill the mold with another 8-pounds of plaster much as you did to create the mold. Imbed the chicken wire for strength and let dry. After the plaster is set, separate the positive mold of your back from the first impression of your back. Turn it over and fill in any gross voids. Mark the outside edges of the mold with a felt marker for orientation. Now that you have your mold you can make a brace for any wetsuit thickness. If you use two thickness of wetsuit, one for cold water and another for semi-tropical waters, you can make two molds. Take your old wetsuit and cover the back mold carefully to comply exactly with the mold—no folds or voids under it. Now cover this with clear plastic wrap held in place with masking tape. You can shape the splint by cutting a piece of construction paper to conform to the final shape of the splint—rounded at the top, curved to slightly extend around the back and ending in a flat bottom just above the buttocks at the bottom of the mold. Use the construction paper as a guide for cutting out fiberglass cloth and roving. Make 3 pieces of fiber glass cloth, two pieces of roving the same size as the paper template. Cut another piece of roving in a strip 6-inches wide and the length of the mold for additional support in the center of the splint. Mix the epoxy according to directions being very careful to keep the ratio of hardener to base accurate. After the two parts are very thoroughly mixed, mix in a small amount of black paste made to color the solution black. Use only a paper cup full and plan on re-mixing and using several more cups of resin. Paint a coat onto the plastic wrap-covered mold and then add a layer of cloth. Paint on more epoxy solution and work into the cloth with a squeegee or a resin roller. Make sure the cloth is fully impregnated. Lay up the remainder of the splint in the following order: cloth, roving, cloth, 6-inch center roving, roving and finally the last piece of cloth. The splint should begin to set within an hour depending on the temperature and epoxy mix. When it is stiff, but before it is fully cured, use a utility knife to cut away the excess cloth for the final shape of the splint. After the splint is set, remove it from the mold and sand the cut edges. The splint should be approximately 18-inches long and 12-inches wide. Have your friend position the splint on your back and mark the path of the weight belt rubber where it crosses the back of the splint. The rubber should cross the thinnest part of your stomach. Drill two small holes in the splint and screw in two small bolts. Re-position the rubber and make corresponding holes in the belt to receive the splint bolts. To avoid tearing the belt, either use a leather punch for the holes or burn them with a hot drywall screw. After you add the necessary weights, you’ll use the bolts to fix the rubber onto the splint with two ss washers and wing nuts. Last, attach a piece of the nylon webbing to the bottom of the splint. Put the splint on and pull the web through your crotch. Where the webbing just appears through your crotch, attach one end of a plastic connection snap. Attach the other end of the plastic snap to another piece of webbing attached to the metal ring. To mount the belt/splint, you’ll detach the crotch webbing at the snap and place the large ring through the free end of the belt material. Place the belt/splint on your back and cinch up the belt with the quick-release buckle. Make the crotch strap connection by snapping the male and female plastic ends together. Lastly, glue the two neoprene strips horizontally to the inside top and bottom of the splint. If you ever need to ditch this belt, simply pull the release as usual and the belt will fly off easily releasing the crotch strap so you’ll be free instantly.
Feedback: After I submitted this article for peer review,
I received a complete critique from Joe Tobin who offered excellent feedback and
suggestions. I also received the following comments:
|


